Our Squirrel Proof Bird Feeder is now Raccoon Proof

Our Bird feeder, empty with the lid on the ground
When my wife got a cute bird feeder as a gift a few years back, who would have thought it needed to be a squirrel proof bird feeder as well. I innocently mounted it on a wooden pole in front of our dining room window for easy viewing. After a few months we noticed that the top lid kept falling off. We thought it was just the wind and added some large rubber bands to hold it on. About a week later the top was off again, and the feeder was empty. Something was climbing the pole. Was it squirrels? I knew that squirrels were common pests around bird feeders. Since I used a wooden pole to support the feeder, there would be no stopping any squirrel. I had some pretty brown valley tin handy, so I nailed a three foot long piece around the post. Success, the bird feeder stayed full over night and the top stopped mysteriously ending up on the ground. We now have a squirrel proof bird feeder.
Three years later my Bird feeder protection failed

Our sheet metal bird feeder pest protection shield before installation
Last spring it was very dry so there was not a lot of goodies for the local animal population to eat. Our bird feeder was full of tasty grain and looked very appealing I am sure. I just bought my wife some geraniums to plant in her new bird bath and all looked great. Two days later I come out and something had eaten most of the geraniums and gotten into the bird feeder and emptied it. I moved the bird bath further away from the bird feeder. Replanted what was left of the plants, went and got some more to fill out some of the holes. Just to be even more safe, I sprinkled blood meal around all the plants . Blood meal is supposed to repel most animals.
Next day, the same thing happened, the bird bath was overturned, plants eaten and the top was off of the bird feeder. What was doing this, I wasn’t sure. I had a live animal trap, one of those where you can do a catch and release. So I set it out near the bird feeder, and put bird feed on a lid behind the trip plate. Next morning, I found a very angry raccoon inside the trap. Releasing the animal far away fixed the problem. Some raccoons are smart enough to climb a metal covered post just like you see the Koala bears climb tree branches.
Raccoon emptied Bird Feeder again

Sheet metal tube shown with the three mounting sticks.
Another clever Raccoon emptied my wife’s bird feeder again. The last time it happened was over six months ago. I noticed our motion sensor light was on in front, and when I investigated found a raccoon at the bird feeder. The feeder had been emptied, the suet was gone ant the lid was on the ground. What a pain, who wants to mess around with a live box trap in the winter, I certainly didn’t. I went online to see what was recommended to keep Squirrels and raccoons from raiding bird feeders. My previous solution was good for squirrels, so if you only have a squirrel problem just cover the bottom of your pole with sheet metal. Do you know it was a squirrel? Did you see the culprit like we did. Last spring I even caught one of the raccoons on top of the bird feeder. What a shame I didn’t have my camera right then.
Finding a Squirrel and Raccoon Bird Feeder Protector

Bird Feeder Squirrel and Raccoon shield mount sticks installed
What I found online was that my existing sheet metal shield was an almost solution. The problem it had was that the diameter was still small enough for a raccoon to get its legs around the post. Many commercial solutions were available for around $40 plus shipping. Most of them were metal tubes that you mounted on your post. I didn’t like spending money, I also didn’t want to take the bird feeder off the post to install it either. I was also taking to long fixing the problem, as my wife restocked the feeder a few days later and it was immediately raided. This time the top was damaged and I had to fix it. What follows is my gift to the bird lovers of the world, who like animals too, but don’t want them eating your bird’s lunch.
Home made Bird Feeder Protector Design Plans

Completed Bird Feeder Raccoon Squirrel Protection
Here was my list of design goals:
- Keep the squirrels and raccoons our of the bird feeder
- Low Cost, free if possible, construction
- Easy to make
- Do not have to remove bird feeder to install
- Can’t be noisy (birds addition)
- must look nice (wife’s addition)
My first though was, why not use a two foot long piece of 6 inch furnace duct? It is galvanized metal, will look nice, and usually comes as an open sheet of metal that you have to clip together to make a tube. I could just hang it on the post just under the feeder using wire. That would cost me about $6 or what ever the duct cost was. My list #5 would not be happy. It needed to be rigidly mounted. After some thought, why not mount strips of wood on the post and slide the tube over them? The day after the second raccoon raid, I knew I had to act now. That meant a special trip to the home supply store, a fifty mile round trip ($7 in gas). I looked in my store room thinking I might have an extra furnace duct piece as I do furnace repair work sometimes. No luck, I did find a piece but it was not pretty. Funny i just added a new list item, must look nice, my wife’s idea.
I was getting ready for a road trip when I remembered I had a left over coil of 20 inch galvanized valley tin I could use to make my own tube. I decided to make a 7 inch tube since I could, though I am convinced a standard 6 inch furnace tube is good. I looked at lots of commercial versions and none were larger than 6 inches. I made a temporary tube around the pole and measured a three inch gap between the post and the new tube. That meant had a four inch post, so I needed 3 three inch spacers. I have a table saw, so I cut up a 2×4 into three sticks 1×1.5 inches in size. I attached them to the post, then slid the tube up over them. My final step was to screw the sheet metal to the bottom of the spacers.
What would I do differently

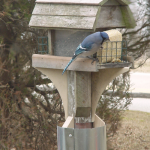
Blue Jay at Bird feeder with anti-Raccoon and Squirrel shield
Its been several days now without raccoon raids on the bird feeder. Looking back in retrospect, I can see that just wrapping the pole in tin was not a good solution. I would stop squirrels, but would not stop raccoons. Also, I could have installed my animal shield on a bare pole, I didn’t need the tin layer underneath. But, I still needed to stop squirrels and other rodents from climbing up the post under the shield. If I didn’t have the tin on the post, I could roll up some metal screen wire make a doughnut shape with it then slide it up under the shield. That would even look nice. Another thought was to cut tabs around the bottom and bend them into the post, but I have always liked doughnuts better myself. So now we not only have a squirrel proof bird feeder, but a raccoon proof one as well.
Bird Feeder Shield Design Process Photo Gallery
-
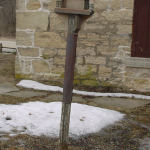
- Our Bird feeder, empty with the lid on the ground
-

- Our sheet metal bird feeder pest protection shield before installation
-
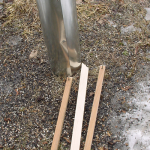
- Sheet metal tube shown with the three mounting sticks.
-
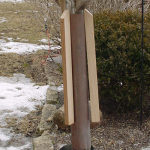
- Bird Feeder Squirrel and Raccoon shield mount sticks installed
-
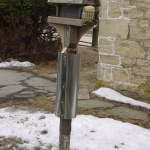
- Completed Bird Feeder Raccoon Squirrel Protection
-
- Blue Jay at Bird feeder with anti-Raccoon and Squirrel shield